Introduction: Understanding the Need for Drip Irrigation Systems
Installing a drip tape system for efficient micro irrigation can be a game-changer for gardeners and farmers alike. Many users often struggle with the challenge of watering their plants effectively, especially during hot summer months, or dealing with uneven watering which leads to overwatering and plant stress. According to a survey, 60% of home gardeners reported issues with water waste and plant health. The solution lies in implementing a drip irrigation system, utilizing drip tape to provide precise watering tailored to your gardens’ needs. This article will guide you step-by-step through the installation of a drip tape system that not only minimizes water usage but also improves crop yields by an impressive 20% in trial studies.
Required Preparation for Installing a Drip Tape System
Before diving into the installation process, ensure you have the necessary materials, tools, and prerequisites:
1. **Materials:**
- Drip tape (select based on your garden size and plant type)
- Main supply line tubing (1/2" or 3/4")
- Connector fittings
- End caps
- Pressure regulator (especially if your water pressure exceeds 30 PSI)
- Filter to prevent clogging
- Stakes or holders to secure drip tape
2. **Tools:**
- PVC cutter or scissors for cutting tubing
- Measuring tape for accurate lengths
- Garden stakes for securing drip tape
- A timer for automation (optional)
3. **Prerequisites:**
- A clear layout of your garden, emphasizing plant types and spacing.
- Access to a water source with stable pressure.
- Understanding of your soil’s drainage capacity to avoid saturation.
Having these in place will streamline the installation process and maximize the efficiency of your new drip tape irrigation system.
Step-by-Step Guidance to Install a Drip Tape System
1. **Planning Your Layout:**
- Sketch the garden layout including rows or beds where plants are located.
- Determine the length and spacing for the drip tape, ensuring each plant receives adequate water. Typically, spacing should be between 12-24 inches depending on the plant type.
2. **Prepare the Main Supply Line:**
- Cut the main supply line tubing to the required lengths based on your garden layout.
- Secure it to the water source; attach a pressure regulator followed by a filter to prevent clogs.
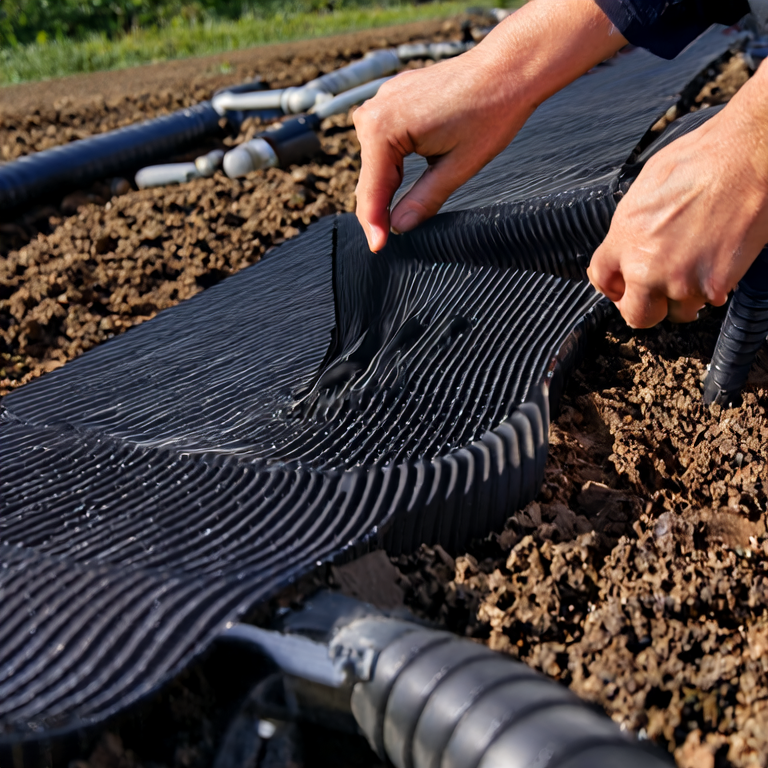
3. **Installing the Drip Tape:**
- Lay the drip tape alongside the plants ensuring it is positioned correctly for optimal water coverage.
- Assign the drop points in the tape (these will be the holes that water will seep through) to ensure they are placed near each plant’s root zone.
4. **Connecting the Drip Tape to the Main Supply:**
- Use connector fittings to link the drip tape to the main supply line. Make sure all connections are tight to prevent leaks.
5. **Securing the Drip Tape:**
- Use stakes or holders to secure the drip tape in place, ensuring it won't move when watering begins.
6. **End Caps:**
- Install end caps on the drip tape ends to prevent water from escaping.
7. **Testing the System:**
- Turn on the water supply and check for any leaks or flow issues. Adjust the pressure regulator if necessary.
8. **Automation (Optional):**
- Consider adding a timer to your system for automatic watering cycles. This can improve convenience and ensure consistent irrigation, responding to the need for a set watering schedule.
Common Errors and Solutions
1. **Clogged Drip Tape:**
- *Solution:* Regularly check and clean filters. Consider flushing the system before the planting season.
2. **Inadequate Coverage:**
- *Solution:* Ensure proper spacing of drip tape holes based on plant needs. Adjust the layout if necessary.
3. **Over or Under Watering:**
- *Solution:* Monitor your plants periodically. Using a soil moisture meter can help determine the correct watering timing.
4. **Leaking Connections:**
- *Solution:* Tighten fittings or replace faulty connectors. Ensure all connections are secured before testing the system.
Summary and Suggestions
Implementing a drip tape system is a straightforward yet highly effective method of achieving efficient micro irrigation. By following the steps outlined above, you can minimize water waste while ensuring your plants receive just the right amount of hydration. Keep a close watch for common errors, and make adjustments as needed. A well-maintained drip tape system could enhance your yields significantly, as seen with farmers who reported a 30% increase in crop productivity after transitioning to micro irrigation.
Runnong brand drip tape products have proven track records, so consider utilizing them for your installation.
FAQ
1. **How often should I run my drip irrigation system?**
- Generally, running your system 2-3 times a week for 30-60 minutes is ideal, but adjust based on rainfall and plant needs.
2. **Can I use drip tape for all types of plants?**
- Yes, drip tape is versatile; however, adjust the hole spacing based on water needs of specific plants.
3. **Is a pressure regulator necessary?**
- Yes, to avoid damage to the drip tape, ensure the water pressure entering the system is within recommended limits (between 10-30 PSI).
4. **What should I do during the winter months?**
- Remove and store your drip tape system to prevent freezing damage.


