+86 151 8877 6668
+86 151 8877 6668
Aug. 14, 2026
Choosing 16mm drip tape for tomatoes, 16mm drip tape for corn, or learning how to choose 16mm drip tape starts with the crop’s root zone, row length, soil texture, and water quality. A suitable drip irrigation system must match emitter spacing, irrigation uniformity, discharge rate, wall thickness, and operating pressure. If the tape releases too much water, roots may remain saturated; if the tape is too thin or the pressure is excessive, leaks and split seams can occur.
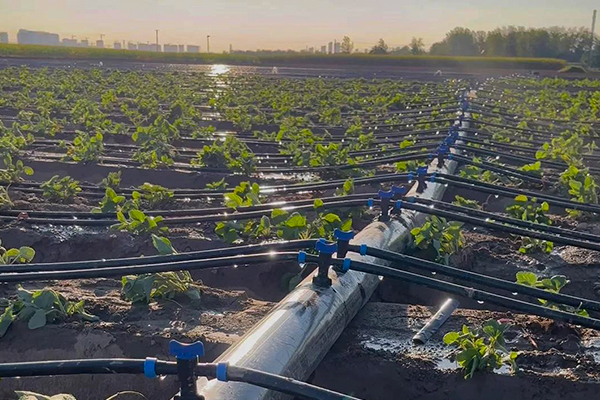
Many growers choose tape by price or by the label “16mm” alone. That approach ignores the factors that determine whether water reaches every plant. The 16mm measurement generally refers to the tape’s nominal outside diameter, but two products with the same diameter may differ in wall thickness, emitter spacing, flow rate, pressure tolerance, and recommended maximum run length.
Typical field problems include:
The correct selection is therefore a crop-and-field decision rather than a simple purchase of “16mm tape.”
Drip tape wall thickness is commonly expressed in mil or millimeters. A thin seasonal tape may be approximately 0.10–0.15 mm, while thicker reusable tape may be approximately 0.20–0.38 mm, depending on the manufacturer and application.
| Application | Common wall-thickness range | Practical consideration |
|---|---|---|
| One-season vegetables on prepared beds | 0.10–0.15 mm | Lower cost, but more vulnerable to rodents, stones, and rough handling |
| Mechanized installation or moderate reuse | 0.15–0.20 mm | Better resistance to installation damage |
| Longer reuse or exposed field conditions | 0.20–0.38 mm | Higher puncture resistance and greater recovery value |
Do not assume that thicker tape automatically delivers better irrigation. Thick tape still requires correct filtration, pressure control, and installation. For many vegetable fields, the best choice is the thinnest tape that can survive the expected handling, soil contact, pests, and number of crop cycles.
Emitter spacing should correspond to the crop’s planting pattern and the soil’s lateral water movement. Common spacings include 10 cm, 15 cm, 20 cm, 30 cm, and 40 cm.
In sandy soil, water moves more vertically and less sideways, so closer emitters are usually safer. In clay or loam, water spreads laterally more effectively, allowing wider spacing in some fields. A simple field test is to run the system for the planned irrigation duration, dig across the wetted strip, and measure the horizontal and vertical wetting pattern.
Emitter flow is commonly stated in liters per hour, such as 0.6, 0.8, 1.0, or 1.6 L/h per emitter. The actual flow depends on pressure and the tape’s pressure-compensating or non-pressure-compensating design.
Use this calculation to estimate the water demand of one lateral:
Total lateral flow (L/h) = number of emitters × emitter flow rate
For example, a 100-meter lateral with 20 cm emitter spacing contains approximately 500 emitters. At 0.8 L/h per emitter:
500 × 0.8 = 400 L/h
That is approximately 6.7 L/min for one lateral. If 20 laterals operate at the same time, the zone requires approximately 133 L/min before accounting for filter, valve, and mainline losses.
Most drip tape systems operate within a relatively low pressure range, often around 0.5–1.0 bar at the tape inlet, although the manufacturer’s specification must take priority. Install a pressure regulator and verify the pressure with a gauge. Excess pressure can stretch or split the tape; insufficient pressure can reduce discharge at the far end.
Tomatoes and peppers generally need stable moisture during flowering, fruit set, and fruit enlargement. A common starting configuration is:
For sandy soil and closely planted tomatoes, 20 cm spacing can create a more continuous wetting strip than 30 cm spacing. For heavy loam, 30 cm spacing may provide adequate lateral wetting while reducing the number of emitters.
Cucumbers and melons have high water demand during rapid vegetative growth and fruit enlargement. Use 20–30 cm spacing when plants are arranged in a continuous row. For widely spaced melon plants, place the tape so that the wetted pattern reaches the developing root zone without keeping the crown permanently wet.
Under plastic mulch, check that the tape is not folded beneath the film. A flat, unobstructed tape reduces localized pressure and helps each emitter discharge as designed.
For 16mm drip tape for corn, the key issue is row layout. Depending on soil texture, planting density, and irrigation objectives, growers may use one tape for each corn row or one tape between paired rows.
Before selecting one tape between two rows, perform a wetting test. If the soil does not spread moisture across both root zones within the planned irrigation interval, use one lateral per row or choose closer emitter spacing.
Leafy crops typically require a relatively continuous wetted strip because plants are closely spaced. A suitable starting point is 10–20 cm emitter spacing with a low-to-moderate emitter discharge. Place the tape centrally under the bed or use two tapes on a wider bed if the wetting profile does not cover the entire planting area.
For onions and carrots, excessive surface flow can increase crusting and disease risk. Shorter irrigation cycles with adequate infiltration time are often preferable to one long application.
Strawberries commonly use one or two laterals per bed, depending on bed width and plant arrangement. Typical options include 15–20 cm emitter spacing and a wall thickness selected according to whether the tape remains in place for one season or several seasons.
Keep emitters positioned near the root zone but avoid placing wet outlets directly against crowns. Excess moisture at the crown can increase disease pressure, especially under plastic mulch and in poorly drained soil.
Runnong and other professional suppliers should provide a technical sheet showing nominal diameter, wall thickness, emitter spacing, rated flow, recommended pressure, filtration requirement, and maximum recommended lateral length. Request this information before comparing prices.
Divide the field into zones that the pump and water source can supply without excessive pressure loss. Avoid operating a large number of long laterals simultaneously if the available flow is limited.
Use the lateral-flow calculation before installation. If one 100-meter lateral requires 6.7 L/min and the pump can reliably provide 40 L/min after filtration and elevation losses, a practical zone may contain no more than five or six such laterals, subject to the manufacturer’s hydraulic chart.
Install the filter upstream of the tape. Select the filtration level based on the smallest emitter passage, not only on the tape diameter. Flush the filter housing and check the pressure before the first irrigation cycle.
Place the pressure gauge downstream of the regulator so that it measures the pressure entering the tape. A pressure reading at the pump alone does not confirm the pressure at the field inlet.
Remove sharp stones, plant residues, and wire from the bed surface. Lay the tape with the emitter outlets facing upward or according to the manufacturer’s installation instruction. Keep the tape straight and avoid tight bends with a radius smaller than recommended.
Use a suitable hole punch to create clean openings in the header pipe. Insert the grommet and takeoff connector without twisting the fitting. Push the tape fully onto the connector and secure it with the locking mechanism.
Do not enlarge holes with a knife. Oversized holes can leak under pressure and may prevent the connector from sealing properly.
Leave the ends of the laterals open and run clean water for several minutes. Continue flushing until the discharge is free of visible particles. Close the ends only after the system has been flushed.
Flush the mainline first, then the submain, and finally each lateral. Otherwise, sediment in the supply pipe may enter the tape immediately after installation.
Place containers under emitters near the beginning, middle, and end of several laterals. Collect water for a measured period, such as 30 minutes, and calculate each emitter’s flow.
For example, if an emitter releases 400 mL in 30 minutes:
0.4 L ÷ 0.5 h = 0.8 L/h
Compare the beginning and end measurements. A large difference indicates excessive friction loss, insufficient inlet pressure, clogging, uneven terrain, or a lateral that is too long.
The basic runtime formula is:
Runtime (hours) = required water volume per area ÷ system application rate
A practical field method is to irrigate for a known duration, measure the wetted depth, and inspect the root zone. During fertigation, inject fertilizer only after the tape has filled with water, then continue irrigation afterward to move fertilizer out of the tape and into the soil.
Do not leave concentrated fertilizer solution in the tape. It can increase corrosion, crystallization, and emitter blockage.
A tomato grower using a 100-meter bed reported that plants near the manifold produced larger fruit while plants at the far end showed midday wilting. The existing system used 16mm tape with 30 cm emitter spacing and no pressure gauge. The grower initially increased irrigation time, but this made the first 30 meters noticeably wetter without solving the dry-end problem.
The corrective process included three changes:
The measured inlet pressure was approximately 1.2 bar, above the tape’s recommended operating range, while the end-of-line flow was substantially lower than the inlet flow. After pressure adjustment and shorter zones, the grower recorded a more consistent wetting pattern and reduced the difference in fruit size between the head and tail sections. The grower also changed irrigation from one long daily cycle to two shorter cycles during peak fruit enlargement.
This case illustrates an important point: changing tape alone may not solve a hydraulic problem. The tape, filter, pressure, zone size, and irrigation schedule must be evaluated as one system. Runnong’s technical selection process should therefore begin with field measurements rather than a catalog number.
Problem: A grower uses 30 cm spacing for lettuce or 10 cm spacing for widely spaced melons.
Solution: Match spacing to plant distribution and soil wetting. Dig a cross-section after irrigation to confirm that the wetted zone reaches the intended roots.
Problem: Sand, algae, and organic particles block emitters.
Solution: Install an appropriately rated screen or disc filter. Flush the filter according to pressure differential and water quality, not only according to a calendar.
Problem: The tape stretches, fittings leak, and seams split.
Solution: Add a pressure regulator, install a gauge, and confirm pressure while the system is operating. Static pressure measured when the pump is off is not sufficient.
Problem: The first section receives more water than the end section.
Solution: Reduce lateral length, use additional submains, lower the emitter discharge, or select a tape with a hydraulic design suitable for the planned length. Follow the manufacturer’s maximum-length chart for the actual slope and pressure.
Problem: Small stones or crop residues puncture the wall during installation or cultivation.
Solution: Prepare a smooth bed, use a thicker wall when needed, and keep cultivation tools away from buried or surface-installed tape.
Problem: Fertilizer residue and biological growth remain inside the tape.
Solution: Flush with clean water, drain the system, remove the tape carefully, and store reusable tape away from sunlight, rodents, and sharp objects. Use chemical cleaning only under a qualified irrigation technician’s guidance and according to material compatibility.
Irrigation uniformity can be estimated with a simple catch-can test. Collect water from at least 16 emitters distributed among the beginning, middle, and end of representative laterals. Rank the collected volumes and compare the lowest quarter with the average of all samples.
A commonly used indicator is the lower-quarter distribution uniformity:
DUlq = average flow of the lowest quarter of emitters ÷ average flow of all measured emitters × 100
For example, if the lowest-quarter average is 0.68 L/h and the overall average is 0.80 L/h:
DUlq = 0.68 ÷ 0.80 × 100 = 85%
A result near 85% indicates substantially better distribution than a system with a lower-quarter average of 0.45 L/h against an overall average of 0.80 L/h, which would produce 56.25% uniformity. The acceptable target depends on crop value, terrain, and system design, but measurement is more reliable than judging the wet surface by eye.
Choose 16mm drip tape according to five measurable conditions:
For tomatoes and peppers, 20–30 cm spacing is often a practical starting point. For leafy vegetables and onions, 10–20 cm spacing may provide better continuity. For corn and melons, row arrangement and soil wetting tests determine whether one tape or one tape per row is appropriate. Always verify actual flow at the beginning and end of the line after installation.
It normally refers to the tape’s nominal diameter, commonly close to 16 mm. The connection size, actual outside diameter, and fitting compatibility should be confirmed on the manufacturer’s technical sheet.
There is no universal maximum length. It depends on emitter flow, spacing, wall thickness, inlet pressure, terrain, and the manufacturer’s hydraulic chart. A 100-meter lateral may work in one field but produce poor uniformity in another.
Many tomato systems begin with 20–30 cm spacing. Use 20 cm in sandy soil or dense planting, and consider 30 cm in loam where the wetting pattern spreads adequately. Confirm the result by inspecting the root zone.
Yes. Use it for one row or between paired rows according to the soil’s wetting pattern. Corn fields with heavy soil may use one tape between rows, while sandy fields may require closer placement or one lateral per row.
Many products operate within approximately 0.5–1.0 bar, but the exact range varies. Use a pressure regulator and follow the product specification. Never select pressure based only on pump capacity.
Flush at installation, after repairs, and whenever pressure loss or uneven discharge appears. In sediment-heavy water, inspect and flush more frequently. Install end valves that make routine flushing easy.
No. Thicker tape generally offers greater puncture resistance and reuse potential, but it costs more and does not prevent clogging or poor hydraulic design. Choose wall thickness according to field hazards and the expected number of crop cycles.
Compare the technical data rather than the outside diameter alone: wall thickness, emitter spacing, nominal discharge, operating pressure, filtration requirement, recommended maximum lateral length, material, and warranty or quality-control information. A lower purchase price may not be economical if repair and replacement rates are higher.
Hot Products
Hot Products
We Are Ready To Serve You
Talk to our experts and we can help you meet all template requirements from scratch. Let us provide assistance for your next project.
Navigation
Navigation
Contact Us
Tel.: +86 151 8877 6668
E-mail: rn-lqh@baodingrunnong.com
WhatsApp: +86 151 8877 6668
WeChat: +86 151 8877 6668
Add.: Pangkou Industrial Zone, Gaoyang County, Baoding City, Hebei Province
Send in Inquiry
Send in Inquiry